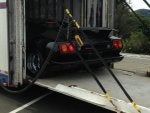
I bought the 91 Diablo George Evans had listed for years. It arrived last week. What a beast.

Sledge4.2

297 posts
·
Joined 2015
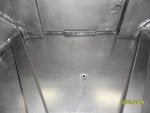
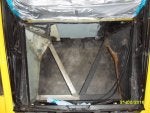
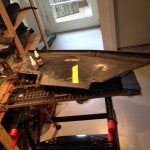
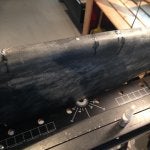
Small explanation to the mounting of the middle floor panel:
1) First I spread body sealant on the areas which are between frame and panel
2) Than i fixed all rivets
3) Mask on the inner side (trunk) all areas with tape
4) Spread body sealant on these areas and wipe away with a wet trigger finger (which is now complete black)
5) substract all tapes when the sealant is still wet.
6) Next day the underfloor side, taped, body sealant, wipe away, remove the tape
I´m very satisfied with the result!")
Tomorrow i will spray this panel with Würth undercoating and later on with Würth black matt.
1) First I spread body sealant on the areas which are between frame and panel
2) Than i fixed all rivets
3) Mask on the inner side (trunk) all areas with tape
4) Spread body sealant on these areas and wipe away with a wet trigger finger (which is now complete black)
5) substract all tapes when the sealant is still wet.
6) Next day the underfloor side, taped, body sealant, wipe away, remove the tape
I´m very satisfied with the result!
Tomorrow i will spray this panel with Würth undercoating and later on with Würth black matt.
Attachments
-
 49.3 KB Views: 123
 -
 48.2 KB Views: 114
 -
 44.6 KB Views: 106
440 posts
·
Joined 2010
Leo this car is going to be too good to use if you are not careful.
You are making something more like Pagani makes now - a work of engineering art. I would be very worried driving a Zonda in case it got dirty or scratched.
Your Diablo is definitely way better than when it left the factory!
my friend, you need to drive it to enjoy it!
(unless you have another for that purpose! LOL)
297 posts
·
Joined 2015
Haha David i just waited for this comment!
I will try to drive around the rain!
I´m perfectionist and i only can work like this. It makes fun to bring it back to the correct glory. My goal is to DRIVE the car in early June.
If not i can use my Roadster. This car is also perfect but driveable!
I have to add it wasn´t my plan to restore the hole front. It started when i removed the front carpet. Than i saw alot of rust and to keep it wasn´t a solution for me!
Your car is back on the road? All wheel bolts coated?
Attached a proof that i´m not crazy:evil:
Regards,
Leo
Attachments
-
 63.6 KB Views: 131
 -
 71.7 KB Views: 110
 -
 70.8 KB Views: 108
Sledge4.2
Discussion starter
3,959 posts
·
Joined 2008
All my sheet metal was tack welded on, I think I will use tek screws or pop rivets so it's all easily removed. It's quite easy to see how the original design promotes corrosion. Water easily gets on the top surface of the upper and lower frame members, then gets behind the sheet metal. Plenty of caulking will help, but a poor design to start.
417 posts
·
Joined 2015
it really is amazing how badly these cars are designed. I have a bit of rust to tend to as well, nothing too bad but it makes me cringe to see cars in the snow now.. and this tubing is so thin.. yikes.
417 posts
·
Joined 2015
giggle. That's all I'm saying. There are some seriously impressive pieces of machinery out there... and yes, this is a piece of art.. but.. a piece of tech? ehh.
Don't take my opinions... uh.. personally.. its still my most favorite of all cars.. Its just not... the best car in the world.
Don't take my opinions... uh.. personally.. its still my most favorite of all cars.. Its just not... the best car in the world.
Sledge4.2
Discussion starter
3,959 posts
·
Joined 2008
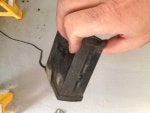
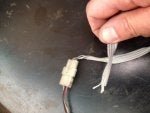
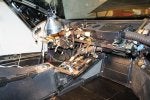
Does anyone know what this is? I found it in the front driver side fender mounted to the frame. The box doesn't have any markings on it, and it has a bundle of wires that goes in the same hole through the firewall as the trunk release cables. It was not connected to anything but the wires look like frayed horn button wires...
I think its aftermarket related to the stereo system, but not sure.
I think its aftermarket related to the stereo system, but not sure.
Attachments
-
 41.8 KB Views: 137
 -
 51.6 KB Views: 135
1,043 posts
·
Joined 2006
That looks like an old Ungo Box alarm accessory. I do believe it's the vehicle motion sensor. That would make sense on why it was mounted to the frame of the car.
Your interior pieces are looking fantastic! Looks like they just came out of the factory. Absolutely beautiful! :tleft:
Your interior pieces are looking fantastic! Looks like they just came out of the factory. Absolutely beautiful! :tleft:
946 posts
·
Joined 2011
Bruno,
looks like a K40 Radar unit. Is there any marking on it. I had a similar looking box in my 91 that my mechanic said I did not need (looks like something that was a after market setup) I will see if there are any pic of it and will post
CCIE
looks like a K40 Radar unit. Is there any marking on it. I had a similar looking box in my 91 that my mechanic said I did not need (looks like something that was a after market setup) I will see if there are any pic of it and will post
CCIE
Sledge4.2
Discussion starter
3,959 posts
·
Joined 2008
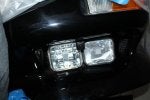
Does anyone have a front mounted camera? I cant find a good (any) place to put it.
In between two fog lights is the only option, not that visible unless you put your head down there, but non the less doesn't look that good.
In between two fog lights is the only option, not that visible unless you put your head down there, but non the less doesn't look that good.
Attachments
-
 41.8 KB Views: 140
Sledge4.2
Discussion starter
3,959 posts
·
Joined 2008
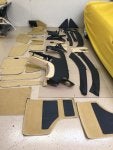
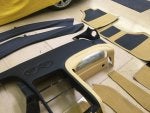
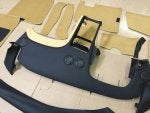
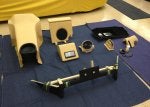
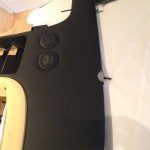
I picked up the first slug of interior bits today. The dash, tweeter pods, all upper trim pieces, and all the carpet.
The interior is being done by Steve and crew at Driven Exotics. I wanted to wait until I saw the work product, and now that I have see it I will comment.
Simply amazing craftsmanship. Perfect is a word that comes to mind. Anal about all the details, fixing every minor issue, and generally making a superb interior.
Further, Steve spent a ton of time with me today giving me tips and tricks on how to put the pieces back together, and we wandered around his show looking at various Diablos, I probably asked 30 questions about various items I was thinking about or pondering, and he was super helpful.
Many folks have commented on Steve and his shop, I am just reinforcing what everyone already knows, great guy and great shop.
Driven Exotics - The Lamborghini Specialists
Attachments
-
 59 KB Views: 176
 -
 58.9 KB Views: 147
 -
 51.2 KB Views: 145
297 posts
·
Joined 2015
Looks very good!!!
Question: They used new rubber pads for the floor mats?
If yes, do you know a source?
Regards,
Leo
Question: They used new rubber pads for the floor mats?
If yes, do you know a source?
Regards,
Leo
Sledge4.2
Discussion starter
3,959 posts
·
Joined 2008
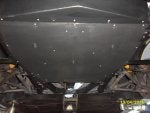
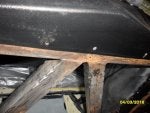
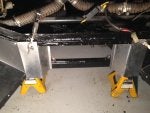
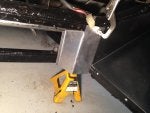
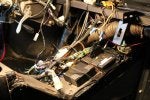
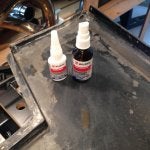
pans all completed, and rather than welding I pop riveted everything in.
I primed all the new metal with SEM self etching primer with top coat once in place.
Existing metal treated with POR 15 and a top coat on the outside, and Eastwood Internal Frame Coating on the inside of all tube elements.
all joints caulked with Wurth Bond + Seal, and coated underside with Wurth high build undercoating.
.
It should be sealed up for another 25 years....not that we have any rain in California these days...
Attachments
-
 65.5 KB Views: 138
Sledge4.2
Discussion starter
3,959 posts
·
Joined 2008
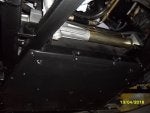
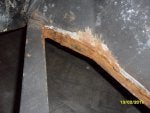
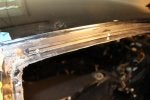
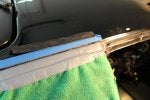
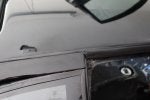
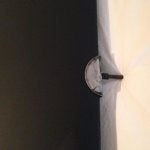
I had to replace the inner door seal, and in the process the aluminum rail mounted to the body failed, and that needed to be repaired. While I was repairing that, I noticed the short seal between the roof and the side pod failed as well.
I re-riveted, unbend and sealed the aluminum mounting channel, put on a new window seal ($$$$), carefully removed the body seal and dug out the old caulking....tedious work my Diablo brothers...tedious work
I re-riveted, unbend and sealed the aluminum mounting channel, put on a new window seal ($$$$), carefully removed the body seal and dug out the old caulking....tedious work my Diablo brothers...tedious work
Attachments
-
 44.6 KB Views: 147
 -
 53.9 KB Views: 127
 -
 30.6 KB Views: 141
417 posts
·
Joined 2015
You just answered about 3 questions I have had. Marvelous.
WHat is with that "corner"? it looks like yuk.. is there some sort of filler there?
WHat is with that "corner"? it looks like yuk.. is there some sort of filler there?
164 posts
·
Joined 2012
Pretty much every car manufacturer in the world has used seam sealer for the last 50-60 years. Some just need a bit more then others.
417 posts
·
Joined 2015
Wow. Just.. wow. lol.
This whole area here has been a mystery to me. Thank you for sharing. MORE PICSS!!!!
This whole area here has been a mystery to me. Thank you for sharing. MORE PICSS!!!!
Sledge4.2
Discussion starter
3,959 posts
·
Joined 2008
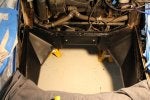
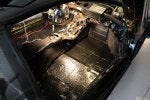
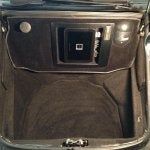
I spent a great day working on the Diablo, I almost totally wired the stereo, which was no small feat to undo what the prior owner installed, but its really clean now. I ran/routed two cameras (front and rear) and put the harness in nice and neat, removing a ton of extra wires.
I also installed hushmat on the floors, and in the door cavities (all places except the reinforcement beam. The floors and door skins are really thin, so this should help reduce road noise.
I also installed hushmat on the floors, and in the door cavities (all places except the reinforcement beam. The floors and door skins are really thin, so this should help reduce road noise.
Attachments
-
 75.4 KB Views: 158
 -
 81.6 KB Views: 157
 -
 82.7 KB Views: 159
 -
 62.3 KB Views: 145
297 posts
·
Joined 2015
I post some pics from my trunk restoration, i think it´s good for inspiration or help for the assembly.
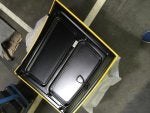
Here you see the trunk lid underside. It had aluminium oxidation.
I brought it to a paint workshop. They removed all oxidation and painted in black matt (a bit semi matt). All bits were powder coated. the hinges were powder coated in glossy the rest bits in semi matt.
It´s exactly like the factory did. All nuts, bolts are new or black/yellow zinc plated.
And finally i made some trunk lid decals, to make it 100%.
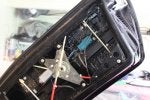
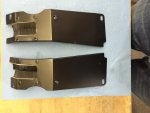
Next picture are both panels were the trunk lid hinges go thru when you open or close the lid. Also powder coated in semi matt, new black rivets and new brushes.
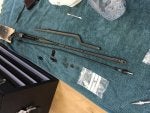
The third pictures showns the disassembled wiper arm, repaired, bought new bits and powder coated it too. For this i will open a own thread when i finished the wiper arm.
Here you see the trunk lid underside. It had aluminium oxidation.
I brought it to a paint workshop. They removed all oxidation and painted in black matt (a bit semi matt). All bits were powder coated. the hinges were powder coated in glossy the rest bits in semi matt.
It´s exactly like the factory did. All nuts, bolts are new or black/yellow zinc plated.
And finally i made some trunk lid decals, to make it 100%.
Next picture are both panels were the trunk lid hinges go thru when you open or close the lid. Also powder coated in semi matt, new black rivets and new brushes.
The third pictures showns the disassembled wiper arm, repaired, bought new bits and powder coated it too. For this i will open a own thread when i finished the wiper arm.
Attachments
-
 71.4 KB Views: 152
 -
 55.1 KB Views: 126
 -
 111.5 KB Views: 133
Sledge4.2
Discussion starter
3,959 posts
·
Joined 2008
I need a little help from the Diablo brothers.
First generation Diablo.
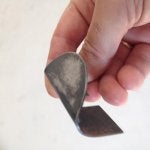
On my car there are four 90 degree tabs, one leg having a half moon, that rest on the 4 guide pins connecting the main dash to the very forward piece against the windscreen.
I am not sure they are OEM, and think maybe there were put there by the PO to cover up leather tears, but not sure.
Can someone go look and see if you have these half-moon tabs
If they are stock, I have no idea what function they perform.
First generation Diablo.
On my car there are four 90 degree tabs, one leg having a half moon, that rest on the 4 guide pins connecting the main dash to the very forward piece against the windscreen.
I am not sure they are OEM, and think maybe there were put there by the PO to cover up leather tears, but not sure.
Can someone go look and see if you have these half-moon tabs
If they are stock, I have no idea what function they perform.
Attachments
-
 45.7 KB Views: 128
 -
 44.4 KB Views: 116
 -
 34.6 KB Views: 107

-
?
-
?
-
?
-
?
-
?
-
?
-
?
-
?
-
?
-
?
-
?
-
?
-
?
-
?
-
?
-
?
-
?
-
?
-
?
-
?
- posts
- 801K
- members
- 57K
- Since
- 2004
A forum community dedicated to all Lamborghini owners and enthusiasts. Come join the discussion about performance, options, modifications, classifieds, troubleshooting, production builds, and more!
Explore Our Forums
Top Contributors this Month
View All
Billionaires
98 Replies
Roberto888
59 Replies
6102Perf
54 Replies